Discord Slash Command
Discord has a new feature called Slash Commands. They allow you to type /
followed by a command name to perform some action. For example, you can type
/giphy cats (a built-in command) to get some cat gifs.
Discord Slash Commands work by making a request to a URL whenever someone issues a command. You don't need your app to be running all the time for Slash Commands to work, which makes Deno Deploy a perfect solution to build such commands.
In this post, let's see how we can build a hello world Slash Command using Deno Deploy.
Step 1: Create an application on Discord Developer Portal
- Go to https://discord.com/developers/applications (login using your discord account if required).
- Click on New Application button available at left side of your profile picture.
- Name your application and click on Create.
- Go to Bot section, click on Add Bot, and finally on Yes, do it! to confirm.
That's it. A new application is created which will hold our Slash Command. Don't close the tab as we need information from this application page throughout our development.
Step 2: Register Slash command with Discord app
Before we can write some code, we need to curl a Discord endpoint to register a Slash Command in our app.
Fill BOT_TOKEN with the token available in the Bot section and CLIENT_ID
with the ID available on the General Information section of the page and run
the command on your terminal.
BOT_TOKEN='replace_me_with_bot_token'
CLIENT_ID='replace_me_with_client_id'
curl -X POST \
-H 'Content-Type: application/json' \
-H "Authorization: Bot $BOT_TOKEN" \
-d '{"name":"hello","description":"Greet a person","options":[{"name":"name","description":"The name of the person","type":3,"required":true}]}' \
"https://discord.com/api/v8/applications/$CLIENT_ID/commands"
This will register a Slash Command named hello that accepts a parameter named
name of type string.
Step 3: Create and deploy the hello world Slash Command on Deno Deploy
Next, we need to create a server to respond to Discord when it makes a POST request with someone's slash command.
-
Navigate to https://dash.deno.com/new and click Play under the Playground card.
-
On the next page, in the editor, click the Settings icon on the top menu. In the modal that pops up, select + Add Variable.
-
Input
DISCORD_PUBLIC_KEYas KEY. The VALUE should be the public key available in General Information section in the Discord application page. -
Copy and paste the following code into the editor:
// Sift is a small routing library that abstracts away details like starting a
// listener on a port, and provides a simple function (serve) that has an API
// to invoke a function for a specific path.
import {
  json,
  serve,
  validateRequest,
} from "https://deno.land/x/sift@0.6.0/mod.ts";
// TweetNaCl is a cryptography library that we use to verify requests
// from Discord.
import nacl from "https://cdn.skypack.dev/tweetnacl@v1.0.3?dts";

// For all requests to "/" endpoint, we want to invoke home() handler.
serve({
  "/": home,
});

// The main logic of the Discord Slash Command is defined in this function.
async function home(request: Request) {
  // validateRequest() ensures that a request is of POST method and
  // has the following headers.
  const { error } = await validateRequest(request, {
    POST: {
      headers: ["X-Signature-Ed25519", "X-Signature-Timestamp"],
    },
  });
  if (error) {
    return json({ error: error.message }, { status: error.status });
  }

  // verifySignature() verifies if the request is coming from Discord.
  // When the request's signature is not valid, we return a 401 and this is
  // important as Discord sends invalid requests to test our verification.
  const { valid, body } = await verifySignature(request);
  if (!valid) {
    return json(
      { error: "Invalid request" },
      {
        status: 401,
      },
    );
  }

  const { type = 0, data = { options: [] } } = JSON.parse(body);
  // Discord performs Ping interactions to test our application.
  // Type 1 in a request implies a Ping interaction.
  if (type === 1) {
    return json({
      type: 1, // Type 1 in a response is a Pong interaction response type.
    });
  }

  // Type 2 in a request is an ApplicationCommand interaction.
  // It implies that a user has issued a command.
  if (type === 2) {
    const { value } = data.options.find((option) => option.name === "name");
    return json({
      // Type 4 responds with the below message retaining the user's
      // input at the top.
      type: 4,
      data: {
        content: `Hello, ${value}!`,
      },
    });
  }

  // We will return a bad request error as a valid Discord request
  // shouldn't reach here.
  return json({ error: "bad request" }, { status: 400 });
}

/** Verify whether the request is coming from Discord. */
async function verifySignature(
  request: Request,
): Promise<{ valid: boolean; body: string }> {
  const PUBLIC_KEY = Deno.env.get("DISCORD_PUBLIC_KEY")!;
  // Discord sends these headers with every request.
  const signature = request.headers.get("X-Signature-Ed25519")!;
  const timestamp = request.headers.get("X-Signature-Timestamp")!;
  const body = await request.text();
  const valid = nacl.sign.detached.verify(
    new TextEncoder().encode(timestamp + body),
    hexToUint8Array(signature),
    hexToUint8Array(PUBLIC_KEY),
  );

  return { valid, body };
}

/** Converts a hexadecimal string to Uint8Array. */
function hexToUint8Array(hex: string) {
  return new Uint8Array(
    hex.match(/.{1,2}/g)!.map((val) => parseInt(val, 16)),
  );
} -
Click Save & Deploy to deploy the server
-
Note the project URL once the file has been deployed. It will be on the upper right hand side of the editor, and end in
.deno.dev.
Step 3: Configure Discord application to use our URL as interactions endpoint URL
- Go back to your application (Greeter) page on Discord Developer Portal
- Fill INTERACTIONS ENDPOINT URL field with the Deno Deploy project URL from above and click on Save Changes.
The application is now ready. Let's proceed to the next section to install it.
Step 4: Install the Slash Command on your Discord server
So to use the hello Slash Command, we need to install our Greeter application
on our Discord server. Here are the steps:
- Go to OAuth2 section of the Discord application page on Discord Developer Portal
- Select
applications.commandsscope and click on the Copy button below. - Now paste and visit the URL on your browser. Select your server and click on Authorize.
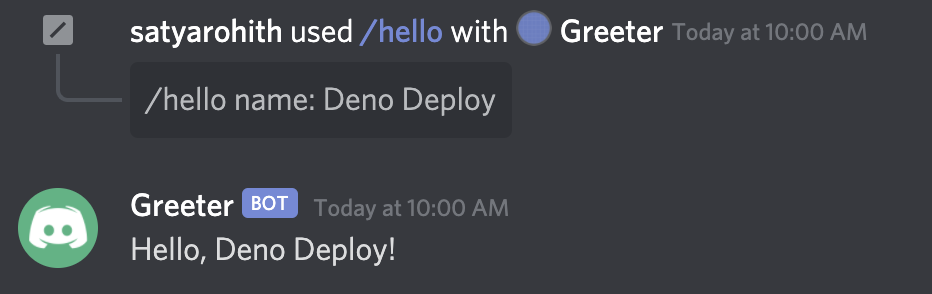
Open Discord, type /hello Deno Deploy and press Enter. The output will
look something like below.
Congratulations for completing the tutorial! Go ahead and build some awesome Discord Slash Commands! And do share them with us on deploy channel of the Deno Discord server.